Rolisteam
![]()
Rolisteam è un tavoliere virtuale gratuito e libero. I giochi di ruolo con penna e carta vengono giocati tradizionalmente attorno a un tavolo. Il tavoliere virtuale (software) sembra rappresentare la giusta soluzione per superare le difficoltà di gioco nella vita reale.
Rolisteam è anche un software multipiattaforma (Windows, MacOS e Linux). Scaricalo da qui: https://www.rolisteam.org/download.html, quindi installalo nel tuo computer. Rolisteam contiene molte funzionalità per offrire un'esperienza di gioco migliore, quali mappe, immagini, lancio dei dadi, scheda personaggi, musica in sottofondo.
Rolisteam è disponibile in diverse lingue: inglese, francese, spagnolo, tedesco, portoghese, italiano, ungherese, olandese, rumeno e, parzialmente, in turco.
Ora spiegheremo l'utilizzo di Rolisteam. Questa esercitazione è corredata di molte schermate, in modo da renderla piacevole e di facile comprensione.
I – Avvio e impostazioni
Quando avvii Rolisteam, compare il pannello di connessione. Questo panello ti consente di aggiungere e impostare il tuo profilo di connessione. Qui vanno impostati i valori corretti in modo da connetterti alla partita corretta. Un profilo "Giocatore" richiede anche di definire il personaggio con cui giocare. Questo pannello può memorizzare più profili di connessione.
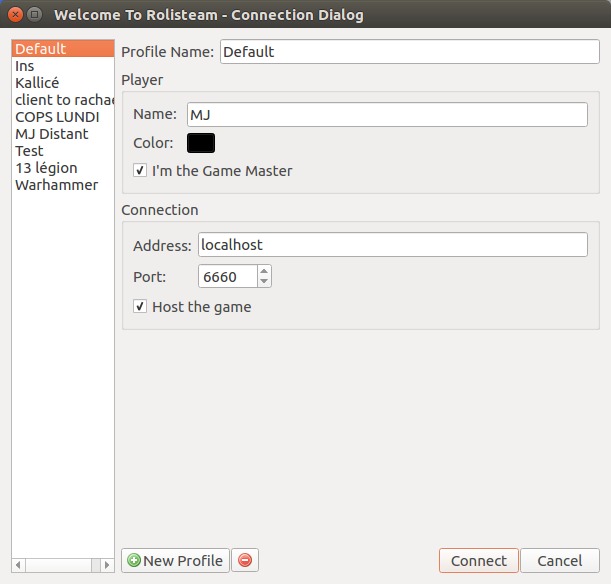
Cambia il profilo predefinito o creane un altro. Consigliamo di impostare un nome che abbia un significato, che rende le cose più semplici.
Per esempio, io gioco in genere come GM il mercoledì e come giocatore il lunedì, i nomi dei miei profili sono: Game on Monday, Game on Wednesday.
Sono presenti quattro modalità di connessione in Rolisteam:
- Host e GM
- Client e GM
- Host e giocatore
- Client e giocatore
I GM (Game Master, o Maestri di gioco) hanno maggior controllo e potere su Rolisteam rispetto ai giocatori: possono aggiungere mappe o immagini; controllano la musica di sottofondo e molte altre cose.
Le differenze tra host e client potrebbero non sembrare cos' ovvie. Ospitare la partita significa che tutti i giocatori devono connettersi con te. Se l'hosting Rolisteam viene chiuso, tutti sono disconnessi dalla partita.
Game Master o giocatore
L'area Giocatore è dedicata alla tua descrizione. Devi scegliere un soprannome (che apparirà agli altri giocatori) e selezionare un colore. Per un'esperienza di gioco migliore, è bene che ciascun giocatore scelga un colore diverso.
L'ultima opzione è la casella di controllo "Sono il Game Master". Spuntala ovviamente solo se tu il GM.
Se sei un giocatore, il pannello di connessione ti permette di descrivere il tuo personaggio nell'area "Personaggio". Viene visualizzata solo se non sei il game master.
Devi impostare il nome, il colore e l'avatar del tuo personaggio. Raccomandiamo di usare come avatar un'immagine quadrata (per apparire bene nelle mappe vettoriali).
Host o client
Host
Se ospiti la partita, il server si deve trovare nel tuo computer. Non hai bisogno di impostare un indirizzo. Devi scegliere una porta e spuntare "Ospita il gioco". Quando sei certo del tuo profilo di connessione, fai clic su "Connetti". Se è impostato tutto correttamente, la finestra di dialogo del profilo di connessione scompare e ti permette di accedere alla finestra principale dell'applicazione.
Nell'area di notifica (angolo superiore destro) è presente un riepilogo delle informazioni di connessione. Devi fornire tali informazioni agli altri partecipanti al gioco.
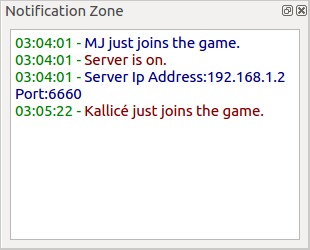
Come puoi notare, nel nostro caso l'indirizzo è 194.250.98.228 e la porta 6661. Per impostazione predefinita, Rolisteam usa la porta 6660. Puoi cambiarla, se vuoi, ma stai attento che quella che utilizzerai non sia già occupata da un altro servizio.
Scegli attentamente chi dovrà ospitare la partita; ampiezza di banda e stabilità sono i due requisiti principali.
L'esperienza di gioco risulterà migliore con una connessione internet migliore. Una linea ADSL è sufficiente allo scopo. Tieni presente che l'host deve stare connesso fino alla fine della partita. Tutti verranno scollegati se l'host esce dal gioco o si disconnette.
Client
Se ti colleghi come client, hai bisogno di un indirizzo e un numero di porta per unirti alla partita. Rolisteam può accedere a un host tramite indirizzo IP (esempio: 194.250.98.228) o tramite nome di dominio (rolisteam.org, giochi.pippo.com). È l'host che deve darti questa informazione.
Togli la spunta alla casella "Ospita il gioco".
A questo punto è tutto impostato. Fai clic su Connessione. Se tutto va per il verso giusto, la finestra di dialogo di connessione scompare e hai accesso all'applicazione.
Primo avvio
Quando la connessione è configurata, vedrai qualcosa di simile:
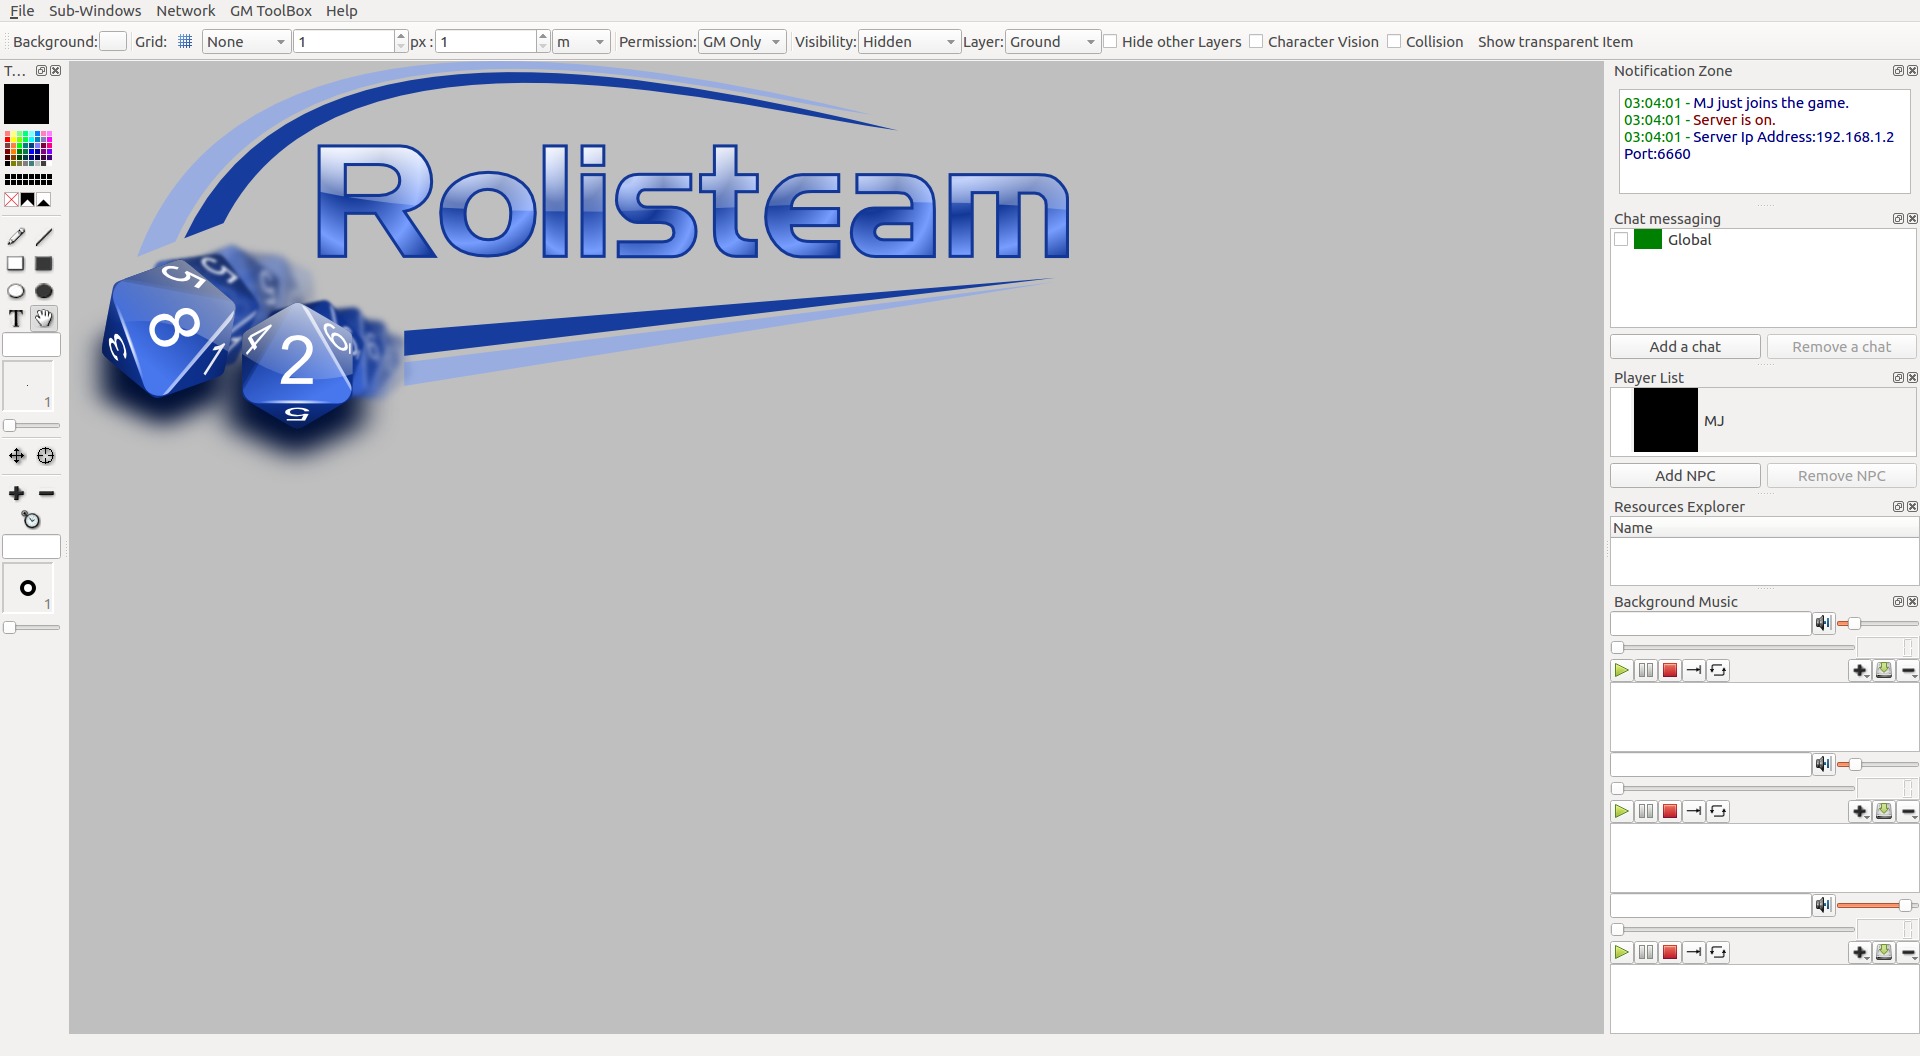
Diamo uno sguardo ai pannelli per vedere quali informazioni puoi trovare in ciascun pannello.
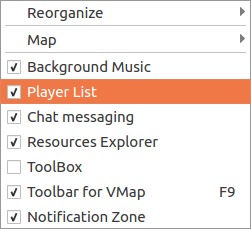
Alla destra e alla sinistra dell'applicazione sono presenti le aree di aggancio degli oggetti. Puoi spostare queste aree, renderle mobili o raggrupparle assieme. Puoi raggrupparle in modo da avere sempre sott'occhio gli oggetti importanti. Gli altri possono essere nascosti e richiamati all'occorrenza, con un clic sulla loro scheda. Le aree di aggancio degli oggetti possono essere ovviamente chiuse (tramite la croce nell'angolo superiore destro). Puoi nascondere/visualizzare le aree di aggancio utilizzando il menu delle sotto-finestre.
Verifica dello stato della connessione
Per verificare in qualsiasi momento il tuo stato di connessione, guarda la barra del titolo di Rolisteam.
Sono presenti, nell'ordine: il nome della storia attuale, la versione del software, lo stato di connessione («connesso» o «disconnesso», il tipo di connessione (client o server) e il nome dell'applicazione Rolisteam.

Area di notifica
Come hai potuto notare, l'area di notifica è utile quando si ospita il gioco. Ti fornisce tutte le informazioni necessarie da inviare agli altri giocatori.
Questo pannello ha più funzionalità di questo. Tutti gli eventi sulla rete vengono registrati al suo interno. Puoi quindi vedere le connessioni in entrata o la disconnessione di un giocatore. Fornisce anche una barra di avanzamento per i trasferimenti lunghi.
Messaggistica istantanea
Quest'area elenca tutte le finestre di messaggistica istantanea. Per impostazione predefinita, Rolisteam imposta la messaggistica globale (diretta a tutti) e la connessione punto-a-punto verso ogni altro giocatore.
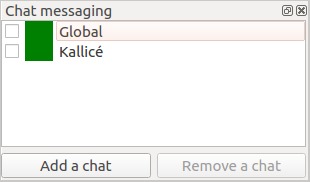
Puoi creare una finestra di chat e impostarla con tutti/uno/molti/nessun giocatore. Qui puoi discutere della tua prossima tattica.
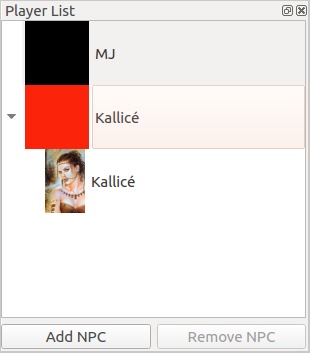
Elenco dei giocatori
Questo pannello mostra tutti i giocatori connessi e i loro personaggi. Puoi espandere o comprimere gli elenchi dei personaggi per ciascun giocatore. Qui puoi visualizzare anche gli avatar dei personaggi.
Questo pannello è molto importante quando utilizzi le mappe in Rolisteam. Di questo argomento tratteremo più sotto.
Lettori audio
Rolisteam possiede tre riproduttori audio per gestire tre tracce in contemporanea.
Puoi nasconderle se hai bisogno di meno riproduttori o di più spazio.
I comandi sono tutti disponibili tramite menu contestuale (clic col pulsante destro del mouse).
Puoi caricare scalette, file audio o collegamenti a flussi o file remoti.
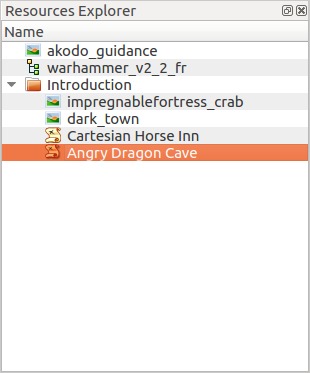
Gestore delle risorse
Il gestore delle risorse tiene traccia di tutti i file che hai aperto in Rolisteam. Fornisce un modo per riaprire rapidamente i file. Puoi ordinare i file in cartelle.
Giocare con Rolisteam
Ora che conosci tutti i pannelli di Rolisteam, ci concentreremo sulle sue funzionalità e sul loro utilizzo.
Messaggistica istantanea
Aprire la messaggistica istantanea è semplicissimo: devi spuntare la chat che ti interessa. È utile aprire quella «globale». Puoi messaggiare con tutti i giocatori. Puoi messaggiare soltanto con un giocatore alla volta.
Se il nome di una chat sta lampeggiando in verde e rosso, significa che hai ricevuto un messaggio.
Puoi aggiungere una nuova chat con chi vuoi, quando vuoi.
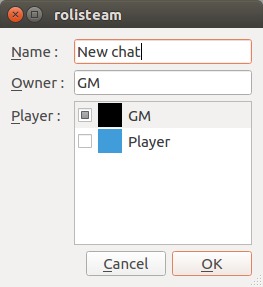
Aggiungere una chat
In basso è presente il pulsante per aggiungere una nuova stanza di chat.
Una stanza di chat possiede un nome, il proprietario e l'elenco dei giocatori partecipanti alla discussione. Il proprietario viene impostato in automatico. Puoi scegliere tutti gli altri parametri.
Fai clic su "Ok" per convalidare.
Cosa puoi fare nella finestra di chat?
La funzionalità principale è, ovviamente, inviare messaggi agli altri giocatori. Ti puoi identificare come te stesso o come il tuo personaggio. È utile per dividere le chat di gioco da quelle fuori dal personaggio (ooc).
Rolisteam converte tutti gli indirizzi http in collegamenti navigabili.
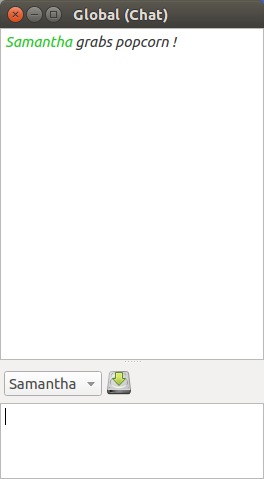
Puoi descrivere le azioni del tuo personaggio col comando /me seguito dalla descrizione dell'azione.
Esempio:
/me sguaina la sua spada e adotta un atteggiamento difensivo!
Apparirà così:
Puoi facilmente re-inviare i messaggi grazie alla cronologia messaggi. Premi su e giù per scorrere all'interno della cronologia, quindi premi il tasto Invio per inviare di nuovo il messaggio selezionato.
Funzionalità disponibili nel menu contestuale
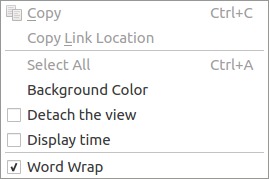
La finestra della chat ha tre funzionalità richiamabili col menu contestuale:
- Puoi cambiare il colore di sfondo della finestra di chat.
- Le finestre delle chat possono essere aperte fuori da Rolisteam. Utile per avere maggior controllo dello spazio di lavoro.
- Puoi visualizzare data e ora alla ricezione del messaggio.
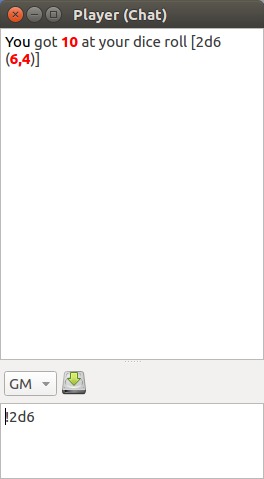
Lancio dei dadi
La finestra di chat è anche il luogo dove puoi lanciare il dado tramite invio dei comandi. Rolisteam incorpora un motore avanzato basato su operatori generici.
Questi operatori possono essere combinati per eseguire calcoli rispetto alle meccaniche di gioco, per fornirti una risposta finale facile da leggere. Per lanciare un dado con sei facce il comando è: !1d6
Il punto esclamativo è importante: segna l'inizio del comando del dado. Può essere sostituito da alcuni altri caratteri. & indica un comando segreto, di cui soltanto tu puoi vedere il risultato.
# invia il comando al GM (e soltanto a lui/lei).
- &2d6
- #2d6
Rolisteam è in grado di lanciare qualsiasi tipo di dado.
- Lancio del dado tra 0 e 9: !1d[0-9]
- Lancio di 20 dadi con 100 lati: !20d100
- Lancio del dado e aggiunta di 4 al risultato: !1d20+4
- Lancio di quattro dadi, e il risultato definisce quanti dadi con dieci lati saranno lanciati: !(4d6)d10
- Lancio di sei dadi con dieci lati, esplodono al dieci e si mantengono i tre dadi migliori: !6d10e10k3
- Espressione matematica: !5-5*5+5
Il risultato è sempre mostrato in rosso per una migliore leggibilità.
Rolisteam funziona con molti operatori; puoi trovare un elenco completo in questa pagina web, in cui sono presenti anche esempi.
Per condividere e trovare comandi di giochi specifici, vai alla pagina dei contatti di Rolisteam o all'elenco macro della Comunità.
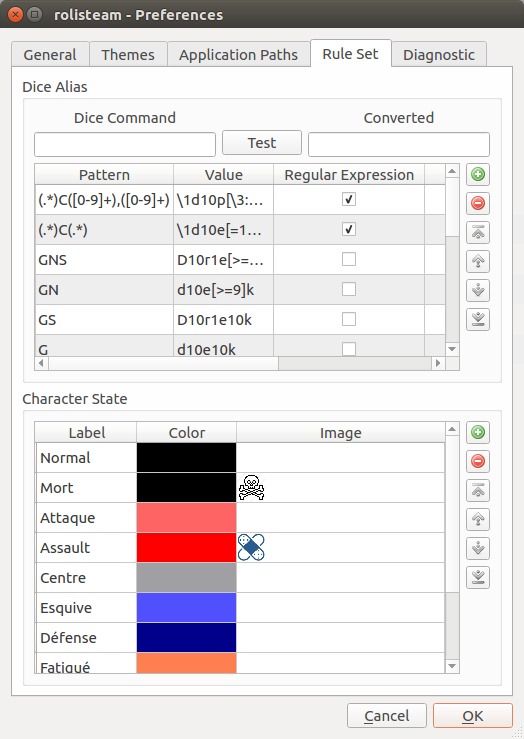
Alias dei dadi (o come semplificare la tua vita)
I sistemi complessi possono richiedere comandi lunghi e complessi. Il sistema degli alias in questi casi aiuta e fornisce un modo per semplificare i comandi.
Vediamo un esempio: !6d10e10k3
Questo comando implementa il sistema Roll & Keep da «Legend of the 5 Rings». È difficile scrivere ogni volta il comando. Un comando più corto sarà decisamente ben accetto e più pratico. Per ottenerlo, Rolisteam fornisce gli alias. Per scrivere un alias intelligente, devi pensare a pochi punti. Primo, identifica la parte che cambia del sistema.
Il numero del dado cambia?
La soglia di difficoltà cambia? E via discorrendo.
Queste sono le domande che ti devi porre.
Nel nostro caso, il dado lanciato e il dado mantenuto cambiano. Puoi dunque definire un alias nelle finestre di dialogo delle preferenze.
Alias: K => d10e10k
come usarlo:
- !6K3 = !6d10e10k3
- !8K4 = !8d10e10k4
Esistono due tipi di alias: l'alias per sostituzione (come l'esempio precedente) e l'alias per espressione regolare. Consulta la documentazione per avere maggiori informazioni sugli alias.
Condividi immagine
Chiunque può condividere immagini con gli altri. L'immagine compare quindi sullo schermo della persona con cui è stata condivisa. Ciascun utente può nasconderla facendo clic sulla barra del titolo. L'immagine può essere visualizzata di nuovo usando il menu Sottofinestra.
Il GM o il proprietario dell'immagine può chiuderla definitivamente (menu File > Chiudi o scorciatoia da tastiera Ctrl+Esc). Per condividere l'immagine puoi usare il menu: File > Apri > Immagine o trascinarla e rilasciarla sull'area principale.
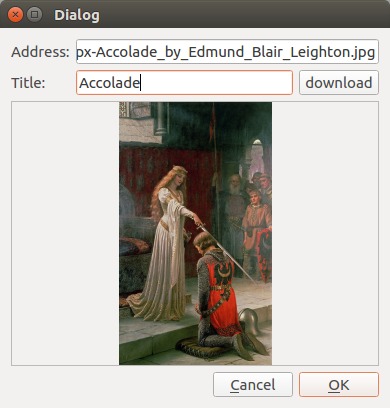
È anche possibile condividere immagini tramite Internet.
Condividere un'immagine tramite Internet
È davvero facile, basta fare clic su File > Apri > Immagine in linea
Mappe
Dalla versione v1.8, Rolisteam fornisce due tipi diversi di mappe: bitmap o vettoriali. Queste sono basate due tecnologie e aspetti concettuali differenti. Con la mappa «bitmap», gli elementi sono disegnati sulla mappa. Con quella vettoriale, gli elementi sono «rilasciati» sulla mappa.
Il GM è l'unico che può creare e condividere la mappa.
Mappe bitmap
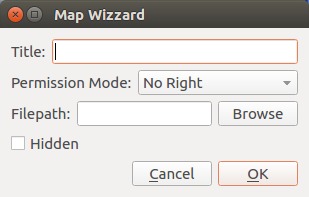
È possibile aggiungere una mappa vuota. Le mappe vuote possiedono dimensione, permessi e colore di sfondo. In alternativa è possibile aprire come sfondo di una mappa.
Mappa vuota
Per aprire una mappa vuota fai clic su File > Nuovo > Mappa, oppure premi CTRL+M.
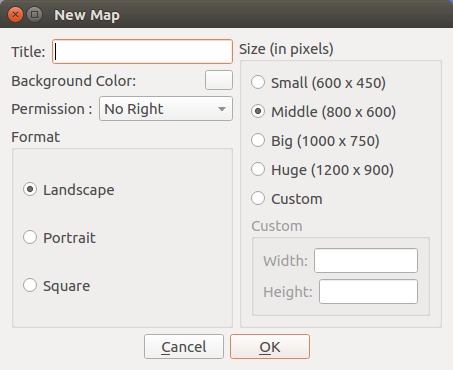
Rolisteam ti chiederà di definire molte proprietà della mappa.
- titolo
- colore di sfondo
- dimensione
- modalità di autorizzazione
- formato
Sono presenti tre modalità di permesso: Nessun permesso e i permessi Personaggio e Tutto.
- «Nessun permesso» indica che solo il Game Master può modificare la mappa.
- «Personaggio» permette ai giocatori di spostare i loro token dei personaggi.
- «Tutti i permessi» attribuisce al Game Master diritti su tutti i giocatori.
Mappa con immagine come sfondo
Per aprire un'immagine come sfondo di mappa, fai clic su File > Apri > Mappa
Questa finestra di dialogo ti permette di selezionare un'immagine per lo sfondo. In alternativa puoi caricare la mappa (.pla) dal tuo computer.
Alcune proprietà della mappa devono essere definite: titolo, modalità permesso e visibilità.
Se spunti «Nascosta» copri la mappa con una nebbia di guerra, e la rivelerai man mano ai tuoi giocatori.
Modifica della mappa
Quando la mappa è aperta, ci puoi disegnare sopra. Per farlo, usa gli strumenti di disegno forniti da Rolisteam: sono tutti presenti nella cassetta degli strumenti della mappa.
[comment]:<>
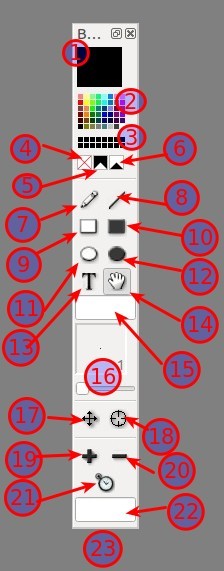 | 1. Colore attivo 2. Colori predefiniti 3. Colori personalizzati 4. Cancellazione colore 5. Colore Nebbia di guerra 6. Cancella colore Nebbia di guerra 7. Penna 8. Linea 9. Rettangolo vuoto 10. Rettangolo pieno 11. Elllisse vuota 12. Ellisse piena 13. Testo 14. Maniglia 15. Campo del testo 16. Larghezza penna 17. Sposta personaggio non giocabile (NPC) 18. Cambia stato NPC 19. Aggiungi NPC 20. Rimuovi NPC 21. Reimposta conteggio NPC 22. Nome NPC 23. Dimensione NPC |
Domande ricorrenti sulle mappe
1. Ho bisogno di più colori rispetto a quelli predefiniti. Ne posso ottenere altri?
È possibile scegliere un colore facendo doppio clic sul colore attivo, grazie alla finestra di dialogo di selezione dei colori.
2. Come posso cambiare l'orientazione del personaggio?
Quando sono selezionati gli strumenti 17 o 18, è possibile cambiare l'orientazione con il clic destro del mouse. Apparirà un contrassegno bianco a indicare la direzione dove guarda il personaggio.
3. Come cambio lo stato del personaggio?
Seleziona lo strumento 18 e fai clic sul personaggio fino a quando raggiungi lo stato adeguato.
- Nero = in salute
- Rosa = dolente
- Rosso = ferito
- Grigio = morto
- Blu = addormentato
- Verde = stregato
4. Qual è il significato della maniglia?
Puoi acchiappare la mappa e spostarla per visualizzare un'altra porzione. Molto utile quando possiedi uno schermo piccolo.
Mappa vettoriale
La mappa vettoriale è stata introdotta in Rolisteam v1.8.
È una grande modifica e ci vorrebbe troppo tempo per descrivere in dettaglio tutte le possibilità che offre.
In questa esercitazione saranno descritte le normali funzionalità di disegno della mappa. Raccomandiamo di esercitarti almeno una o due volte prima di utilizzare questa funzionalità nel gioco.
Potrebbe confondere dover scoprire il comportamento della funzionalità mentre stai giocando. Tutte le possibilità offerte dalle mappe vettoriali saranno descritte in un'altra esercitazione.
Se hai bisogno di ulteriori informazioni sulle mappe vettoriali, consulta la documentazione.
Aggiungere una mappa vettoriale
Per creare una mappa vettoriale vuota, vai al menu File > Nuovo > Mappa vettoriale, oppure premi CTRL+V.
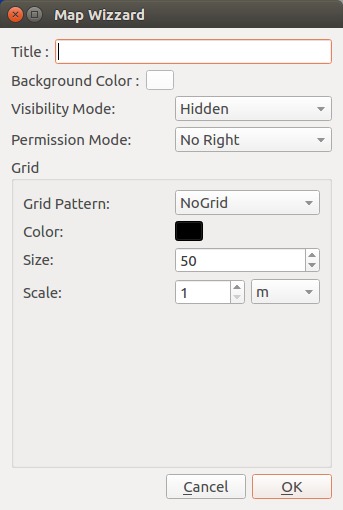
Rolisteam chiederà i valori per alcune proprietà della mappa:
- Titolo
- Colore di sfondo
- Modalità di autorizzazione
- Modalità di visibilità
- Forma della griglia
Quando tutti gli elemento sono impostati, fai clic su OK per creare la mappa vettoriale. Tieni presente che la mappa vettoriale non ha dimensione, la sua dimensione è infinita.
Modifica della mappa vettoriale
Quando compare la mappa, puoi modificarla. Sono presenti due tipi di modifiche: visiva o di accesso.
Per prima cosa, tutte le modifiche visive possono essere eseguite grazie agli strumenti presenti nella barra degli strumenti o sulla stessa mappa.

 | 1. Colore attivo Doppio clic su di esso per scegliere il colore tramite finestra di dialogo di selezione colore. 2. Tavolozza dei colori 3. Selettore di luminosità 4. Modalità modifica In modalità **Normale**, puoi disegnare sulla mappa. In modalità **Maschera**, puoi nascondere delle parti ai giocatori. Aggiunge la nebbia di guerra. In modalità **Svela**, rimuovi parti della nebbia di guerra (non esegue nulla se la nebbia di guerra non è attivata). 5. Penna 6. Linea 7. Rettangolo vuoto 8. Rettangolo pieno 9. Ellisse vuota 10. Ellisse piena 11. Testo 12. Maniglia Questo strumento seleziona gli elementi e li sposta. Due possibili azioni sono la rotazione o il cambio di dimensione o forma degli elementi. Per spostare gli elementi fai clic su un elemento, mantieni premuto il pulsante del mouse e sposta il mouse (è un'azione di trascinamento e rilascio). Per modificare la dimensione o la forma, devi premere il tasto `Maiusc` e spostare la maniglia. Per selezionare più elementi assieme, premi il tasto `Ctrl` e fai clic sui vari elementi. 13. Regola 14. Percorso 15. Ancora Collega un elemento (figlio) a un altro (genitore). Se sposti il genitore, si sposteranno anche tutti i figli. 16. Pipetta 17. Larghezza penna 18. Aggiungi NPC 19. Reimposta contatore NPC 20. Contatore NPC 21. Nome NPC 22. Opacità dell'elemento attivo |
Interazione sulla mappa
Sulla mappa Rolisteam fornisce un menu contestuale. Da questo menu puoi eseguire molte azioni. Il contenuto del menu dipende dalla selezione corrente.
Per saperne di più su tutte le funzionalità disponibili dal menu contestuale, leggi questa pagina della documentazione.
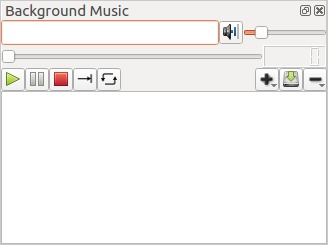
Musica di sottofondo
Il GM può trasmettere musica di sottofondo.
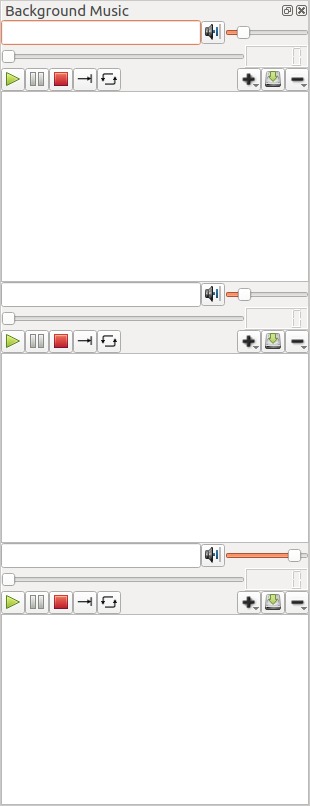
Rolisteam ha tre riproduttori audio, indipendenti. Ciascun riproduttore possiede le caratteristiche standard che ci si aspetta da un riproduttore audio.
Controlla lo stato della riproduzione con i pulsanti Riproduci, Pausa e Ferma. I riproduttori audio accettano i seguenti modi di riproduzione: solo uno, uno per uno, ripetizione.
- Il modo Solo uno riproduce il brano attivo e di ferma alla fine.
- Il modo Uno per uno riproduce il brano attivo e poi passa al successivo. Si ferma quando raggiunge la fine della scaletta.
- Il modo Ripetizione riproduce il file attivo in continuazione.
Aggiungere musica
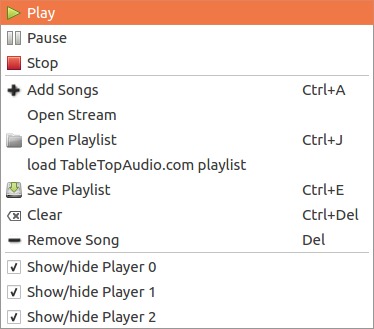
Col pulsante + si eseguono tutte le azioni di aggiunta dei file alla scaletta. Un clic apre la finestra di dialogo di scelta file. Un clic lungo mostra un sottomenu con ulteriori azioni:
- Aggiungi brano alla scaletta (predefinito)
- Apri scaletta
- Carica la scaletta TableTopAudio.com
- Aggiungi flusso audio
Rimuovere musica
Il pulsante - serve per rimuovere la musica dalla scaletta, il clic lungo mostra la funzione di azzeramento, che cancella la scaletta di riproduzione.
Tutte queste funzioni sono raggiungibili dal menu contestuale.
File audio
Per questioni di tipo legale, Rolisteam non invia dati audio. Provvede alla sincronizzazione dei riproduttori audio. Se non puoi mettere i tuoi file su Internet o avere un flusso audio, devi inviare i file ai tuoi giocatori, i quali devono memorizzarli nei loro computer. Grazie a vari servizi presenti in rete, la condivisione e la sincronizzazione delle cartelle è diventata davvero facile.
In alternativa, la scaletta di riproduzione TableTopAudio.com funziona benissimo.
Editor dei verbali
Può essere utile registrare tutti gli eventi relativi alla partita. A questo scopo Rolisteam contiene un editor di testo per redigere i verbali della partita: qui possono essere annotati NPC importanti, prove, ecc. Le note possono essere salvate in formato html, pdf o .odt.
Scheda dei personaggi
Dalla v1.8, Rolisteam gestisce la scheda dei personaggi. Rolisteam contiene RCSE («Rolisteam CharacterSheet Editor», ossia l'editor della scheda personaggio di Rolisteam). RCSE è il compagno perfetto per la modifica della scheda di un personaggio.
Costruire la propria scheda
Per creare una scheda personaggio, segui questi passaggi:
- Trascina e rilascia l'immagine di sfondo per ciascuna pagina della scheda personaggio e salva il lavoro
- Disegna il campo sulla parte destra di ciascuna pagina e salva il lavoro
- Genera il codice, verifica il risultato nella scheda «vista» e salva il lavoro
- Fai le modifiche sui campi (imposta etichetta e altre proprietà), ritorno al passaggio 3 fino a quando non raggiungi la qualità voluta, salva spesso il lavoro
- Nella scheda personaggio, aggiungi i personaggi e imposta il valore appropriato a ciascun campo e salva il lavoro
- Carica il file risultante in Rolisteam e condividi il personaggio col suo giocatore
È in programma la stesura di un'esercitazione su come creare una scheda personaggio.
Usare la scheda personaggio in Rolisteam
Il suo uso è semplice. Il GM carica la scheda personaggio (.rcs), quindi la deve condividere (menu contestuale) col personaggio del giocatore. Un giocatore può avere molti personaggi. Un personaggio appartiene solo a un giocatore. Il personaggio possiede soltanto una scheda personaggio.
Dove posso trovare le schede dei personaggi?
Abbiamo riunito tutte le schede dei personaggi in un deposito Git, inoltre puoi discutere delle schede nel forum.
Deposito schede dei personaggi
Sessione e storia
Lo scenario riunisce tutti i media supportati da Rolisteam in un unico file: mappe, mappe vettoriali, immagini, scheda personaggio, scalette di riproduzione e verbali sono memorizzati all'interno dello scenario. Altri media saranno aggiunti in futuro.
Questi documenti sono elencati all'interno del gestore delle risorse. Questo pannello mostra quale documento fa attualmente parte del tuo scenario. Viene memorizzato anche lo stato di ciascun documento (aperto, caricato e non caricato).
È importante capire il flusso di lavoro dei media. L'esempio più semplice è un'immagine. Quando trascini e rilasci un'immagine all'interno di Rolisteam. Tutti la vedono. L'immagine viene caricata e aperta. Quando fai clic sulla croce nell'angolo della finestra, l'immagine scompare soltanto per te. In questa situazione, l'immagine è ancora caricata. Per visualizzarla di nuovo puoi andare nel menu della sottofinestra.
Per chiuderla per tutti, devi eseguire il comando File > Chiudi (Ctrl+Esc). Lo stato del file viene impostato su non caricato. Tuttavia, il file compare all'interno del gestore delle risorse, facente parte dello scenario. Puoi spostarlo in un capitolo per una migliore visibilità. Oppure puoi rimuoverlo quando non è più necessario tenerlo.
Conclusione
L'esercitazione è finita. Altre ne seguiranno. Spero che sia stata utile e mi auguro che ti diverta giocando con Rolisteam.